Imagine this, grocery shopping alone, 4 hours of making your favorite dishes while sipping on some wine, having 12 meals made for your family... Does it really sound that bad? Doesn't to me!
Ok, I don't really have many "secret weapons," per se. But, I do have some ways that life has adapted since having kiddos that make things a bit easier on me. I wish I were organized enough to have them numbered, but I don't. But if I had numbered my own personal tricks, this one would be granted my favorite number, number 7... I try to keep at least a few pre-prepared meals in the freezer.
I didn't start with the cook ahead craze until after I had baby number 2. For me, it was just not realistic to cook the homemade meals I wanted for my family every night. But what I've found does work for me is to take about a day per month to make several batches of meals that I can freeze and save for those weeknights when I need a lifeline. In reality, I try to double up on making meals whenever I can. However, I try to devote half a day or so each month to making a larger batch of meals to get a stockpile in my freezer.
Honestly, this is not a perfect science for me. And I look to many websites for guidance. My favorite is onceamonthmom.com. I've had my share of failures. Meals that just don't turn out that great in the long run. But really, that would happen even if I weren't making meals ahead of time. I have some staples and favorites that are definite lifesavers for me, and I'll list some below.
I once had a mommy friend say to me that she had tried one time to make meals ahead, but quickly gave up because they didn't have that fresh-made taste her family needed. My response to that is this... Are my frozen meals as great as fresh made? I don't know. But, my frozen meals can taste pretty darn good. I can play around with recipes and find out what works well for us. And, the reduced stress and extra time with my kiddos makes the pre-prepared meals all worth it to me.
Consider doubling up (or stockpiling) whenever you can. I think it's at least worth giving it a try! For me, one day of intense food-making definitely saves me some sanity in the long run.
My favorite Pre-Prepared Full Meals:
-Beef Bourgingnon
-Beef Stroganoff
-Chicken Pot Pies
-Pork Chile Verde
-English Muffin "Pizzas" (Lunch)
-Breakfast Sandwiches- English Muffins, Eggs, Cheese, Ham (Breakfast)
Time-Saving Pre-Made Recipe Items:
-Mexican-flavored ground beef
-Pre-cooked Italian meatballs
-Brown-Rice Spanish Rice
-Mashed Potatoes/Greens
Saturday, September 22, 2012
Wednesday, September 19, 2012
Sweet potato pillows
Sweet Potato Pillows
These yummy snacks are not quite cookies, more like little tiny soft bread-like pillows. And in fact, that's what my daughter named them. They are slightly sweet and very satisfying. A great take along snack for toddlers too.
 1 cup mashed sweet potato
1/4 cup milk
1 egg, slightly beaten
4 tablespoons melted butter
1 cups sifted flour
1/4 cup flax meal
2 teaspoons baking powder
1/2 cup brown sugar
1/2 teaspoon salt
1 teaspoon cinnamon
1/4 teaspoon allspice
1/4 cup finely chopped pecans or walnuts (can be ommited)
Mix together first four ingredients until well combined, add sugar. Sift together flour, flax meal, baking powder, salt and spices. Combine wet and dry ingredients. Add nuts (optional). Chill for one hour. Drop by the spoon full on cookie sheet. Bake at 375 for 15-20 mins. These are done when slightly springy to the touch and/or a toothpick comes out clean. Enjoy!
These yummy snacks are not quite cookies, more like little tiny soft bread-like pillows. And in fact, that's what my daughter named them. They are slightly sweet and very satisfying. A great take along snack for toddlers too.

1/4 cup milk
1 egg, slightly beaten
4 tablespoons melted butter
1 cups sifted flour
1/4 cup flax meal
2 teaspoons baking powder
1/2 cup brown sugar
1/2 teaspoon salt
1 teaspoon cinnamon
1/4 teaspoon allspice
1/4 cup finely chopped pecans or walnuts (can be ommited)
Mix together first four ingredients until well combined, add sugar. Sift together flour, flax meal, baking powder, salt and spices. Combine wet and dry ingredients. Add nuts (optional). Chill for one hour. Drop by the spoon full on cookie sheet. Bake at 375 for 15-20 mins. These are done when slightly springy to the touch and/or a toothpick comes out clean. Enjoy!
Friday, July 20, 2012
The Splice of Life - Easy Video Editing
Since having kids I've become a big video and picture taker. Like so many parents, I want to document so many of their experiences. Now add I have kind of a bad memory, and that I am a very visual person, and that makes the pictures and videos that much more important to me.
The problem is that I amass all these images and they they pretty much just sit on my computer. Our pictures gallery is the screen saver to our computers, so I'll catch the snapshots that way. But the videos in particular just tend to pile up. Here and there I've tried a bit of video editing. But it's so time consuming and the software is just complicated enough that every time I do I am relearning the whole process. So we have very little videos that are actually edited and compiled in a meaningful way.
Now with child number two, my iPhone has actually become my main source of taking videos and pictures on a daily basis. I pull out our Canon Vixia for more important events, but the iPhone is my workhorse.
I recently was about to transfer over some videos onto my computer where they'd sit untouched until who-knows-when. But these were precious videos of my little guy learning to walk. I decided to do a search of video editing apps for my iPhone.
Voila! There were so many to choose from! I tried out just a couple, but literally within about 2 minutes I could figure out which were too complicated, too limited in features, or just plain not easy to work with.
I ended up using a video editing program called "Splice." It's a great little program that allows for compiling pictures and videos. It has several options for transitions, and you can add titles and text in between pics/videos. You can also add your own music and voice recordings. You can adjust the volume of music and videos individually. The app allows for editing the length of the audio and pics/videos. It doesn't have all the bells and whistles you may have when using some of the popular computer programs (you can't pick the font for your title for example). But, it offers much of what you'd need to easily put together videos on your iPhone. I was able to put together a video of him walking in under 10 minutes, nice!
I wishfully think that "someday" I'll have time to go back on my computer and put together videos into lovely, meaningful movies. But in reality, that's not likely to happen- at least not anytime soon. Spending 10 minutes quickly putting together a video with a theme while the kids are taking naps... now that's doable!
Wednesday, July 11, 2012
Bloggin about not bloggin
So, I've realized that my blogging has considerably slowed down and thought I'd take a moment to reflect on that. So, what's been up? Really one main reason the blogging has slowed is that I haven't been so creative in the kitchen area lately. But that's a good thing! The summer months have brought some amazing fresh produce in our weekly delivery. We've been enjoying some very simple meals, with little (or nothing) done to fresh produce. I love making simple dishes that taste fresh and pure. Of course I love my rich, creamy, saucy, savory dishes as well. But something about the summer just makes simple dishes taste that much better.
What have we been eating? Well, last night it was a simple pan-seared chicken breast with zucchini, yellow squash, fresh garlic, and new potatoes. All cooked together in a large skillet with olive oil, fresh lemon juice, salt and pepper. Another favorite is grilled steak or tri-tip, with grilled corn. Mmmm, and seared salmon with blanched green beans. Simple, simple.
So, hence the need to not record my recipes in the usual manner. The big number 2 reason is that my baby is no longer a baby. At 14 months, little man pretty much eats what the rest of us does. He remains a good eater and shows a clear preference for fruit and vegetables. My fingers are crossed, I hope he remains the veggie lover that he is today!
And finally, I started this blog after being asked numerous times about how I make baby food for my kiddos. While starting it, I decided it would be nice to use it to catalogue some other aspects of my stay-at-home journey too- from logging my non-baby recipes, to little projects we work on. So here's to future blogs, whatever they may hold, even if I'm just bloggin' about not bloggin.'
Tuesday, June 5, 2012
Carrot Tomato Comfort Soup

Yields 2 Servings
Ingredients:
-1 c baby carrots
-1 large tomato (peeled and chopped)
-2 oz heavy cream
-1 tbs parmesan cheese
-1/2 tsp lemon juice
Salt and pepper to taste
Directions:
1) Clean veggies. Peel and chop tomatoes. I leave seeds in because they all get pureed to oblivion.
2) Steam carrots for approximately 15 minutes until tender. Drain liquid.
3) Add tomatoes to carrots and steam all for an additional 15 minutes. You want carrots very tender to make a smooth soup.
4) Puree tomatoes and carrots. Add all remaining ingredients and puree until smooth. If needed, add a splash of water to create desired soup consistency.
Wednesday, May 16, 2012
Pesto
It's Wednesday, which means produce delivery at our house. This is one of those weeks when I just didn't have time to check out what was coming in our box and I was so excited to see all the goodies. Really, fresh strawberries, cherries, apriums, and peaches! Oh yes, and there were plenty of veggies too. Before I get on with one of my favorite easy recipes, here's a look at what was in my Abundant Harvest Organics box.

Ok, on with the PESTO! Included in my box were basil and green garlic, great items for pesto. To make pesto, you'll want to be able to blend all these yummy ingredients somehow (food processor, hand blender, Brezza)
 Ingredients:
-2 heads of green garlic (or 2-3 cloves)
-5 tablespoons olive oil
-1 lemon
-2 tablespoons parmigian cheese
-pinch of salt
Directions:
1) Remove basil leaves from stalks and wash them
2) Cut the ends of the green garlic so that you have just the white part of the green garlic (Confused? Check out the pic)
3) Combine all ingredients in food processor, bowl (if using a handblender), or my favorite the baby Brezza
4) Blend in pulses, add extra olive oil if consistency is more dry than paste-like
5) Serve however you like it! Over whole wheat pasta is our favorite way. My 12 month-old loved this, surprise, surprise!


Variations- Add nuts for a little crunch. If I wasn't giving this to our 12 month old, I would have added in almonds or pine nuts in the blending stage, it adds a little crunch to the texture. Sometimes I also add chopped green olives as well, but if you do so balance the saltiness with a bit more lemon juice. Wanna be sneaky, add in a cube (or two) of your pureed greens to warm pasta then toss in the pesto... trust me, know one will know.
Thursday, May 10, 2012
Aprium & Peach - Double duty delight
 Yum, stone fruits are in season. With our own homegrown May Pride peaches ready to rock and the generous helping of apriums in our produce box, I've been pining (or peachin' heehee) for something to do with them all. Fresh is best. But I've dried some. I've also made a mash up that does double duty as baby food/compote and fruit spread.
Inredients:
-5 Aprium
-5 Preaches
Optional-
-Sugar or agave to sweeten to taste
-Lemon juice
Directions:
1) Clean, peel, cut fruit into chunks
2) Steam until chunks are just cooked through (I do 10 min in the Brezza)
3) Drain off excess liquid, this is important to not have too runny of a spread
4) To make a smoother consistency blend as desired. Or remove mixture from steam basket and mash with a fork.
5) To make fruit spread I add about 1/5 tsp of lemon juice and 1 tsp agave to each 1/2c of fruit.
*Tip- Freeze the fruit spread in ice cube tray as you would baby food. Take out cubes as needed and heat in the microwave for about 20-30 seconds to put "fresh" spread on sandwiches, toast, yogurt, ice cream.
Wednesday, May 9, 2012
Fava beans, a lotta work, a lotta tastiness
 So what comes to mind when you hear "fava beans?" For me, all I think of is Silence of the Lambs of course! I'd never tried these myself just because of that fact. And really, there haven't been many opportunites to try them anyway. But alas, this week they arrived on my doorstep. So this was my chance to disconnect fava beans and Hannibal Lector.
 Being as this was my first time with fava beans, I used the parboil and peel method. Basically this amounts to boiling the whole bean pod briefly, putting them in an ice bath, removing the beans from the pod, then carefully removing the thick waxy covering from each bean. Was this time consuming? For me, yes, it took me about 30 mins from start to finish. Would I do it again, for sure. To be honest, the end result tasted a bit like edamame to me. But, imagine a creamier, almost buttery, edamame. Lightly salted, and voila, very simply and quite tasty.
Here's a link to the Abundant Harvest newletter, with instructions for various ways to cook fava beans.
 |
| Fava beans in the pod |
 |
| Beans remove from pod |
 |
| Fava bean with coating removed. Colors varied from vibrant yellow to lime green. |
 |
| Beans in waxy skin (left), completely shelled (right). |
Monday, April 30, 2012
mmmeatloaf
 I love me some comfort food on a cold dreary day, and nothin' says comfort like meatloaf. Here's a healthier more wholesome version of meatloaf with some good stuff snuck in!
Ingredients:
meatloaf
1 lb lean ground beef
1/2c rolled oats
1/2c bulgar
1 tsp salt
1/2 tsp pepper
1/2 tsp garlic powder
1/2c milk
1/2tsp worcestershire sauce
1/2c diced onion
1/2c rolled oats
1/2c bulgar
1 tsp salt
1/2 tsp pepper
1/2 tsp garlic powder
1/2c milk
1/2tsp worcestershire sauce
1/2c diced onion
1/4tsp ground mustard
2tbs ketchup
1/4tsp chili powder
1 egg
3 cubes (or 3 oz) pureed greens
glaze
1c ketchup
1 tsp apple cider vinegar
2 tbs brown sugar
1 tsp mollasses
1/2 tsp sriracha
1c ketchup
1 tsp apple cider vinegar
2 tbs brown sugar
1 tsp mollasses
1/2 tsp sriracha
1) Preheat oven to 350 degrees
2) Combine all meatloaf ingredients in a large bowl and spread in ungreased loaf pan
3) Bake at 350 for 45 mins
4) Meanwhile make glaze
5) Remove meatloaf from oven, increase oven to 380 degrees, glaze, bake an additional 30 mins
Saturday, April 21, 2012
Asian-style Slaw
.JPG) This recipe is easy-peasy and my favorite way to enjoy all the fresh little cabbages that have been coming in our produce box.
This recipe is easy-peasy and my favorite way to enjoy all the fresh little cabbages that have been coming in our produce box.
Ingredients:
-1 small head cabbage
-1/2 cup grated carrots
-2 daikon radishes
-1 tbs light mayonnaise
-1/4 cup Annie's Natural Shiitake Sesame Vinaigrette
Directions:
1) Using large-holed grater, grate all vegetables
2) In a large bowl mix vegetables with mayonnaise and Shiitake dressing
.JPG)
.jpg)
Friday, April 20, 2012
Edible Rainbow
So most of my posts are about healthy foods, but of course we indulge in some less-than-wholesome goodies. Here is a fun & yummy treat I made for our playgroup potluck.
 There are lots of recipes posted online for rainbow gelatin desserts, the white layer varies (some use whipped cream, some use sour cream, some use sweetened condensed milk). I chose sweetened condensed milk because pictures using sour cream or whipped cream looked like the colors bled easily. Sweetened condensed milk mixed with plain gelatin (find this in the Jello area) worked perfect! Is the white layer necessary... no, but it does keep the colors more distinct. I wouldn't have re-invented the wheel, but I tweaked the recipe just enough that I wanted to remember what worked well for me.
 There are lots of recipes posted online for rainbow gelatin desserts, the white layer varies (some use whipped cream, some use sour cream, some use sweetened condensed milk). I chose sweetened condensed milk because pictures using sour cream or whipped cream looked like the colors bled easily. Sweetened condensed milk mixed with plain gelatin (find this in the Jello area) worked perfect! Is the white layer necessary... no, but it does keep the colors more distinct. I wouldn't have re-invented the wheel, but I tweaked the recipe just enough that I wanted to remember what worked well for me.
 Yields: 24 9-oz Jello Cups
Make this the day before you need it, especially if it's the first time.
5 - 1/4oz envelopes Knox Gelatine (Comes in boxes of 4, so two boxes)
2 cans sweetened condensed milk
6 flavors Jello, 6 oz size (we used Cherry, Orange, Lemon, Lime, Berry Blue, Grape)
24 - 9-oz cups
(PressNSeal or Plastic Wrap to cover the cups is optional)
 |
| Some of the ingredients, keep in mind you need two boxes of Knox & 2 cans evaporated milk. Oh, and more than 2 cups, LOL. |
-Bring 1 3/4 cups water to a boil over the stove or microwave. In a microwave safe bowl, add water and one can of sweetened condensed milk. Set aside.
-Bring 1 1/4 cups water to a boil. Remove from heat. Slowly stir in 2 1/2 packets of Knox Gelatin.
-Combine the milk mixture and the gelatin mixture.
-Let cool
2) Make first colored layer.
-In a large bowl, add 2 cups boiling water to Jello
-In a separate bowl, combine 1 1/2 cups cold water with 1/2 cup ice
-Add icy water to Jello (This is where my recipe deviates a little from Jello instructions, but the very cold water and slightly less water than Jello's recipe will help the layer set faster)
-Let cool to room temperature, by placing in the refrigerator.
*TIP - It took about 10 mins for the Jello to cool. You want it still very liquidy and not solidified. Letting the Jello cool is important to keep layers from running together.
3) Start layering
*TIP - Beforehand I made markings on a test cup so I could see about how much liquid I'd need for each layer then used it as a guide. I also used this test cup as the first cup I'd pour layers into to make sure the Jello from the previous layer was set enough. There will be enough Jello to have one or two test cups.
*TIP - Cupcake/muffin tins are the perfect size for holding & transporting the cups.
-Pour some Jello (or milk/gelatin) into a measuring cup or container with a pouring spout.
-Pour Jello layer into plastic cup to desired height. Try to keep the spout of the measuring cup as close to the cup as possible to minimize bubbles when pouring.
-Put cups in the refrigerator for 5 mins. If possible transport to freezer for the next 10 mins. This helps the layers set faster. Or if you are patient, you can leave it in the refrigerator to set. If a small amount of ice crystalizes on the Jello that's ok.
-After the layer is set, pour a thin layer of the cooled milk/gelatin. If you are doing all six colors, make sure to keep the white layer THIN or you will run out of room in your cup. Having just enough white to cover the colored layer is perfect. I kept my white layers thin, so they usually set in the fridge after about 5-10 mins.
4) NOW REPEAT!
4) NOW REPEAT!
-Make second batch of milk/gelatin mixture when needed.
*TIP - THIS IS IMPORTANT- To keep layers from running, make sure the Jello and milk/gelatin are about room temperature before pouring your layer. If it's too warm, it will liquefy the layer below it and cause the color to bleed.
*TIP - If milk/gelatin solidifies too much, microwave for 10 seconds to liquefy.
*TIP - If milk/gelatin solidifies too much, microwave for 10 seconds to liquefy.
*TIP - To speed up the process, make the next layer of colored Jello right after pouring the previous colored layer into the cups, this will give the next color some time to cool.
5) To finish off, since I was transporting these I put them in cupcake tins and cut squares of PressNSeal Wrap to cover the tops of the cups.
Any questions? Leave a comment!
Saturday, April 14, 2012
Chicken Bruschetta Salad

 Ingredients:
-4 large ripe tomatoes
-About 1/3 cup olive oil
-1/4 tsp crushed red pepper
-Salt and pepper
-1 tbs butter
-1/4 cup Parmigian Cheese
-8 fresh basil leaves
-2 heads fresh garlic (or about 16 cloves)
-1 head lettuce
-1 tbs Red Wine Vinegar
-2 chicken breasts
1) Prepare vegetables. Cut a small X on the bottom of each tomato, scoring just through skin. Peel and finely chop garlic. Finely chop basil. Wash and cut lettuce.
2) To peel tomatoes: While bringing a large pot of water to boil, set aside a large bowl of icy water. Put tomatoes gently in boiling water. Let sit for about one minute. Remove tomatoes and place them in icy water. Peel the skin back, if necessary use a paring knife to aid the peeling.
3) Remove seeds from tomatoes. Here's the messy and fun part. Remove stems from tomatoes, cut in quarters, use your fingers to scoop out the tomato seeds and goo. Set tomatoes aside.
4) Heat olive oil over medium heat. Reserve a small amount of oil for dressing salad.
5) Add garlic to heated oil, cook on med-low (do not fry) until garlic is just softened.
6) Add tomatoes to pan, simmer for 5 mins.
7) Using a potato masher, break up tomatoes. Add chili flakes, salt and pepper. Continue simmering for 20 mins more of med-low to low heat.
8) Meanwhile cook chicken breasts, seasoned with salt and pepper, until cooked thoroughly.
9) Remove tomatoes from heat, add butter, parmigian cheese, and basil. Add chicken and toss mixture together. Let cool slightly.
10) In a large bowl, dress lettuce with red wine vinegar and olive oil.
11) Serve chicken/tomato mixture over lettuce.
Want to try this some different ways? This freezes great, so try doubling the recipe and serving later over pasta, over pizza with a little mozzarella, or on fresh bread. As for ingredient variations- We also enjoy this with 1/2 c leeks added with garlic, leeks often come in our produce box this time of year. We've also used green garlic instead of cloves and added kalamata olives. We've dressed salad with balsamic vinegar instead of red wine vinegar. So tweak as desired. The key ingredients are the tomatoes, garlic, olive oil, parmigian, and basil.
Thursday, April 12, 2012
Tart Passion Fruit & Lemonade
 I was so excited to get a sampler of passion fruit with my weekly produce delivery. I actually had no idea what it was at first. I know passion fruit can vary from sweet to tart. And this particular purple little guy made me pucker. I like sour, but I have to admit, between the tartness and the texture of the seeds, I just wasn't down to eat it alone. But, as the saying goes... when life gives you a tart passion fruit make... well, you get it. I'm sure the sweeter variety would also make a tasty drink.
 Oh, and let me say something about the smell and texture of this drink. The fragrance of passion fruit was absolutely amazing. It may have been the best smelling drink I've ever had. And the juicy, crunchy, tart seeds were a thousand times yummier than boba. So get a passion fruit & drink up!
Ingredients:
1 passion fruit
1 tbs lemon juice
1 1/2 tbs agave nectar
1 1/2 cups water
Directions:
Gently scoop pulp and seeds from passion fruit. Mix with lemon juice, agave nectar and water. Serve over ice with a straw to suck up all that crunchy seed goodness!
Wednesday, April 11, 2012
Much Ado about Daikon
What to do with Daikon Radishes? I've been pleasantly surprised by how versatile they can be. But before I get ahead of myself... what are they? Well, they look kinda like an albino carrot. I was worried by the name "radish" since radishes are not my favorite. In my boxes I've had some that are long and thin, very carrot like. And some that are a bit bigger, a bit more rounded and fatter. In my experience, the carrot-like ones have tasted very mild and almost like a carrot, with almost no radishness to them. The bigger, fatter ones had a familiar mild radish flavor. However, the flavor was slight without the heat of their red globe-like cousins. I had no "bleh" factor when eating them.
*TIP* Try 'em before you cook 'em! Try them raw before you decide how to use them. Peel them, cut off the ends, and sample a bit. Peeling them is especially good to avoid some spicy and bitter notes in the radish. If they are very mild steaming is a great way to go. If they're spicier (and you don't like spicy) baking can be a great way to draw out the sweetness and minimize spiciness.
So what to do with these guys? For our 11 month old, I choose the milder flavored daikons, diced them and steamed them until very tender. I actually snack on them like this too. I enjoy them plain, without seasoning. The mild flavor goes down easy. I imagine for the rest of the family, the mild daikons would be super yummy tossed with a little olive oil and balsamic vinegar. But really, they're tasty as-is.
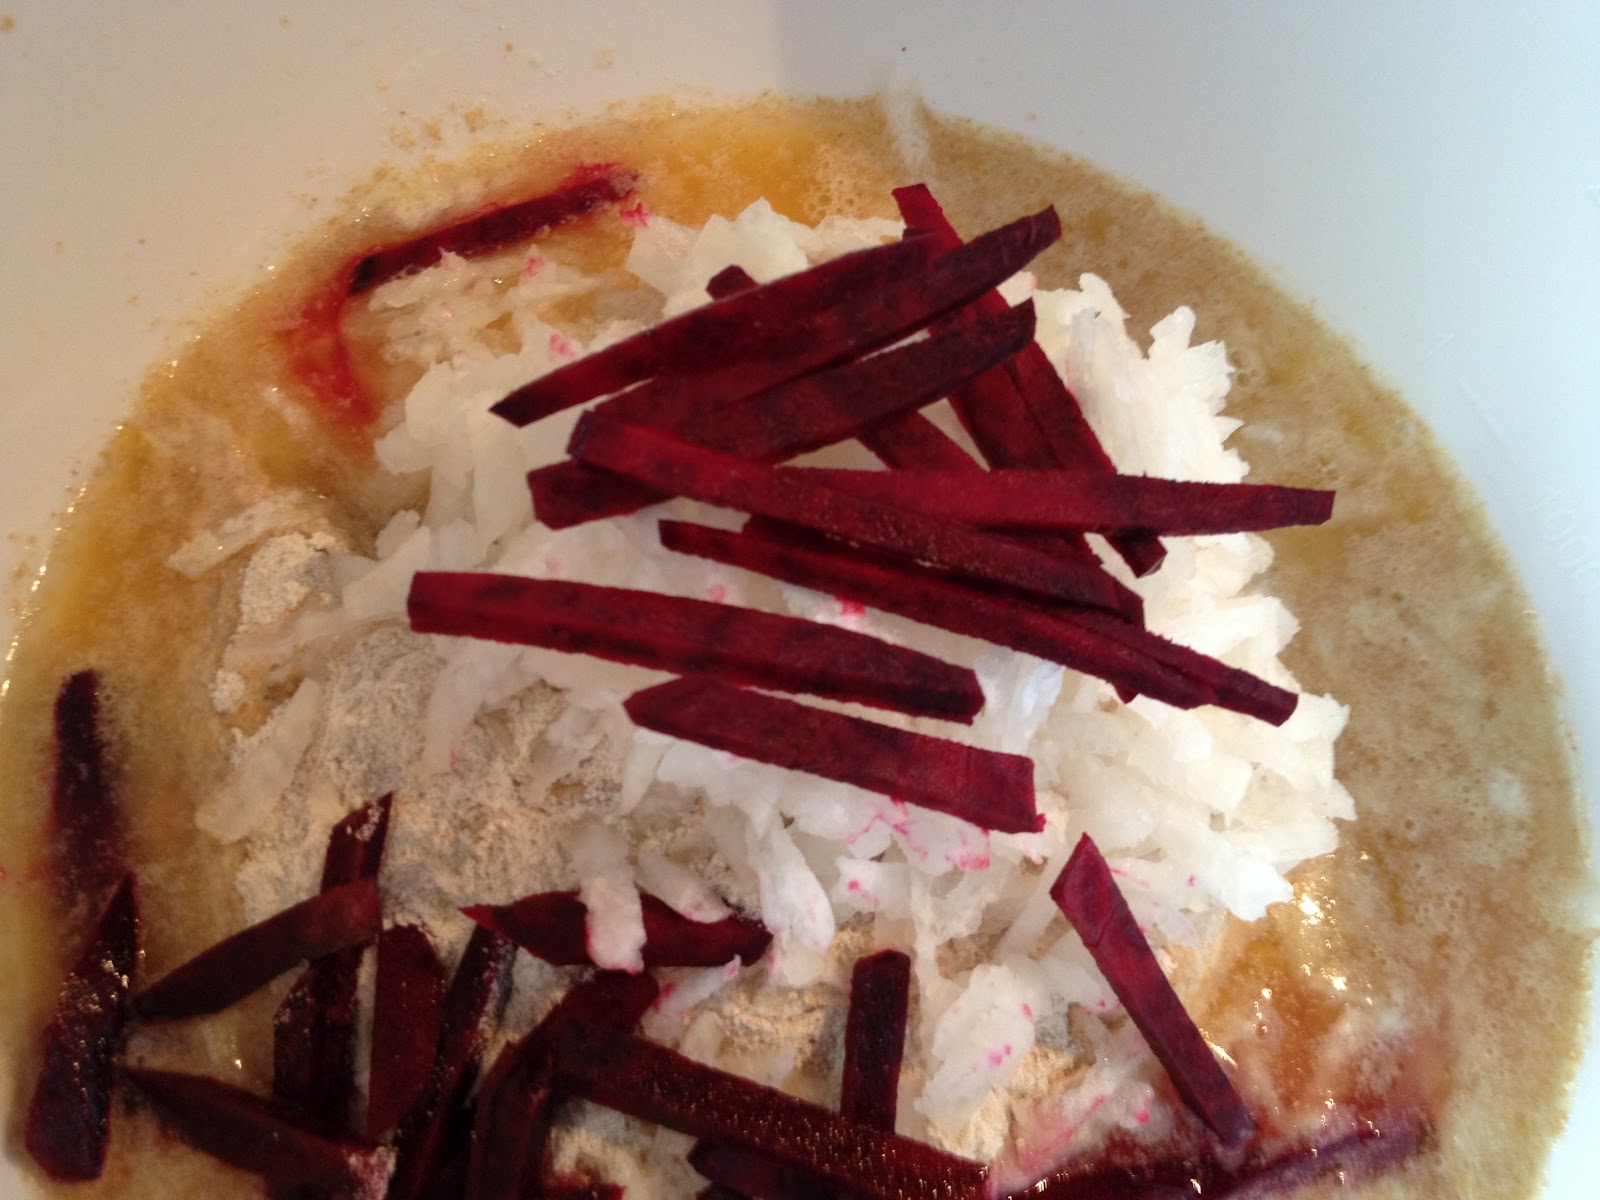
For the slightly spicy ones, they are hidden wonderfully in oatbars. The combo of baking them and adding ingredients with mild and sweet flavors work well. For my picky preschooler, I add beets to make these "pink" oatmeal bars. (What 3 1/2 year-old princess-loving girl would deny a pink treat?!)
*TIP* Try 'em before you cook 'em! Try them raw before you decide how to use them. Peel them, cut off the ends, and sample a bit. Peeling them is especially good to avoid some spicy and bitter notes in the radish. If they are very mild steaming is a great way to go. If they're spicier (and you don't like spicy) baking can be a great way to draw out the sweetness and minimize spiciness.
So what to do with these guys? For our 11 month old, I choose the milder flavored daikons, diced them and steamed them until very tender. I actually snack on them like this too. I enjoy them plain, without seasoning. The mild flavor goes down easy. I imagine for the rest of the family, the mild daikons would be super yummy tossed with a little olive oil and balsamic vinegar. But really, they're tasty as-is.
For the slightly spicy ones, they are hidden wonderfully in oatbars. The combo of baking them and adding ingredients with mild and sweet flavors work well. For my picky preschooler, I add beets to make these "pink" oatmeal bars. (What 3 1/2 year-old princess-loving girl would deny a pink treat?!)
Sneaky Pinky Oat Bars (With Daikon Radish & Beets)
 Ingredients:
2 cups rolled oats , uncooked
1 cup flour (we use whole wheat)
1 cup orange juice
1/3 cup brown sugar
1/2 teaspoon cinnamon
1/4 teaspoon nutmeg
1/2 teaspoon salt
1/2 cup vegetable oil
 1/2 teaspoon vanilla extract
1 cup peeled grated mild daikon radish
1 beet (finely julienned, grated, or pureed)
Butter, oil, or cooking spray for greasing pan
(Optional, honey or agave to trickle over bars)
*For the newer eater, you may want to finely grate or puree ingredients.
*Keep in mind that the beet juice can stain!
 Directions:
1 Preheat oven to 375 degrees F.
2 Generously grease a 9 x 13 inch pan, or two 8 inch by 8 inch pans. I like to use butter.
3 Combine all ingredients in bowl and mix well.
4 The mixture should be moist enough to form a ball, without extra liquid. If too dry add a bit of water or orange juice
5 Put mixture in prepared pans and spread evenly.
(Optional - drizzle with honey or agave for extra sweetness)
 6 Bake for 30 minutes.
7 Remove from oven and cut into squares while still hot.
8 Wait until the bars cool before trying to remove them from the pan.
*Try these slightly warmed with almond or peanut butter, yuuuum!
*Try these slightly warmed with almond or peanut butter, yuuuum!
Steamed Daikon Radish & Sweet Potato
 First, taste test your daikon radish to test for peppery flavor. The long-thin ones are often very mild tasting with no peppery zing familiar to radishes.
First prepare the radishes, by gently washing and peeling. Trim off both ends of the radish. Cut into small bite-size chunks. Steam until very tender (in my Baby Brezza, this takes about 15 mins). Test a piece by seeing if it will mash easily with a fork. While these are good all by themselves, I like to serve them along with sweet potato or apple.
Tuesday, April 10, 2012
Honoring Others Through Action
My grandfather recently passed away. His death has led to much reflection, especially thoughts about his life and all the ways I admire him. He was very much a calming presence and I'll miss the sense of peace he brought to our family. I'm saddened by our loss. But, I see my children's smiling, energetic, bright faces, I need to be strong and present for them. So, what to do with the sense of sadness I feel for our loss? For now at least, I have to focus on honoring my grandfather rather than grieving him. I think his many admirable traits and make a conscious effort to do at least one thing daily specifically to honor that trait, and his memory. It's a quiet way I can remember a man that meant so much to me. So today, think about someone that you cherish. Pick an admirable characteristic about that person. Do something, even one small thing, with that person in mind. Honor them through action.
Friday, March 30, 2012
Sweet Potato Chocolate Milk

What kid doesn't love chocolate milk? Sweet potato puree nearly disappears in the sweet treat. Trust me, our little lady is a chocolate milk connoisseur and doesn't detect it whatsoever.
Yields: Approx 7 oz
Ingredients:
6 oz chocolate milk (we like Silk PureAlmond Dark Chocolate Almond Milk, but it's just as good with the dairy version)
1 oz cooked sweet potato puree
Directions:
Blend chocolate milk and defrosted sweet potato puree for 30 seconds with a hand blender to fully incorporate the puree with the milk.
Thursday, March 29, 2012
Filling Sweet Potato Bars
Ok, these are really sweet potato, banana, apple, spinach bars - Don't tell my kids!
8) Bake at 400 for 30 mins and test doneness. To test doneness, pierce in middle with fork or knife, it should come out clean. Continue baking until cake appears firm in the middle, is slightly golden on top, and passes the "doneness" test! Cooking times will vary.
* This should be done, but it will set more as it cools. Let cool to room temperature. (I know it smells delicious, but wait for it to rest!) I make small rectangles and store it in the refrigerator. They seem to get even a little denser after settling over night. A great breakfast for younguns.
These tasty little treats are yummy for all, but I made them especially for our 10 month old. He wants to feed himself, and of course the purees just won't do for that! I went with grated apple because it seems to hold things together a little better. This is a bit denser than a cake. I imagine a cream cheese frosting would be amazing on these. Makes a great "feed yourself" food for the older infant. My picky eater daughter also loves them.
 |
Ingredients:
1 1/3 cups whole wheat flour
1/2 cup brown sugar
2 teaspoons baking powder
1/2 teaspoon allspice
1/2 teaspoon nutmeg
1/2 teaspoon cinnamon
1/2 teaspoon salt
1 1/2 cups mashed sweet potatoes
1 mashed banana
1 cup grated apple
3 oz pureed spinach (3 oz is approximately 1/3c + 1tbs) (can substitute or kale, or collard greens)
1/4 cup melted butter
2 eggs, lightly beaten
Directions:
1) Preheat oven to 400 degrees
2) Grease pan with butter or cooking spray
3) In a medium bowl, combine flour,sugar,baking powder,allspice,salt.
4) In a large bowl, combine potatoes,melted butter bananas,eggs, blend well.
5) Gently toss grated apples in flour mixture
6) Add to flour mixture to wet ingredients and gently stir
7) Pour into pan. I used a glass 8" square baking dish. Cooking times will vary based on cooking dish!1) Preheat oven to 400 degrees
2) Grease pan with butter or cooking spray
3) In a medium bowl, combine flour,sugar,baking powder,allspice,salt.
4) In a large bowl, combine potatoes,melted butter bananas,eggs, blend well.
5) Gently toss grated apples in flour mixture
6) Add to flour mixture to wet ingredients and gently stir
8) Bake at 400 for 30 mins and test doneness. To test doneness, pierce in middle with fork or knife, it should come out clean. Continue baking until cake appears firm in the middle, is slightly golden on top, and passes the "doneness" test! Cooking times will vary.
* This should be done, but it will set more as it cools. Let cool to room temperature. (I know it smells delicious, but wait for it to rest!) I make small rectangles and store it in the refrigerator. They seem to get even a little denser after settling over night. A great breakfast for younguns.
Tuesday, March 27, 2012
Arts/Crafts - Food Pyramid Collage
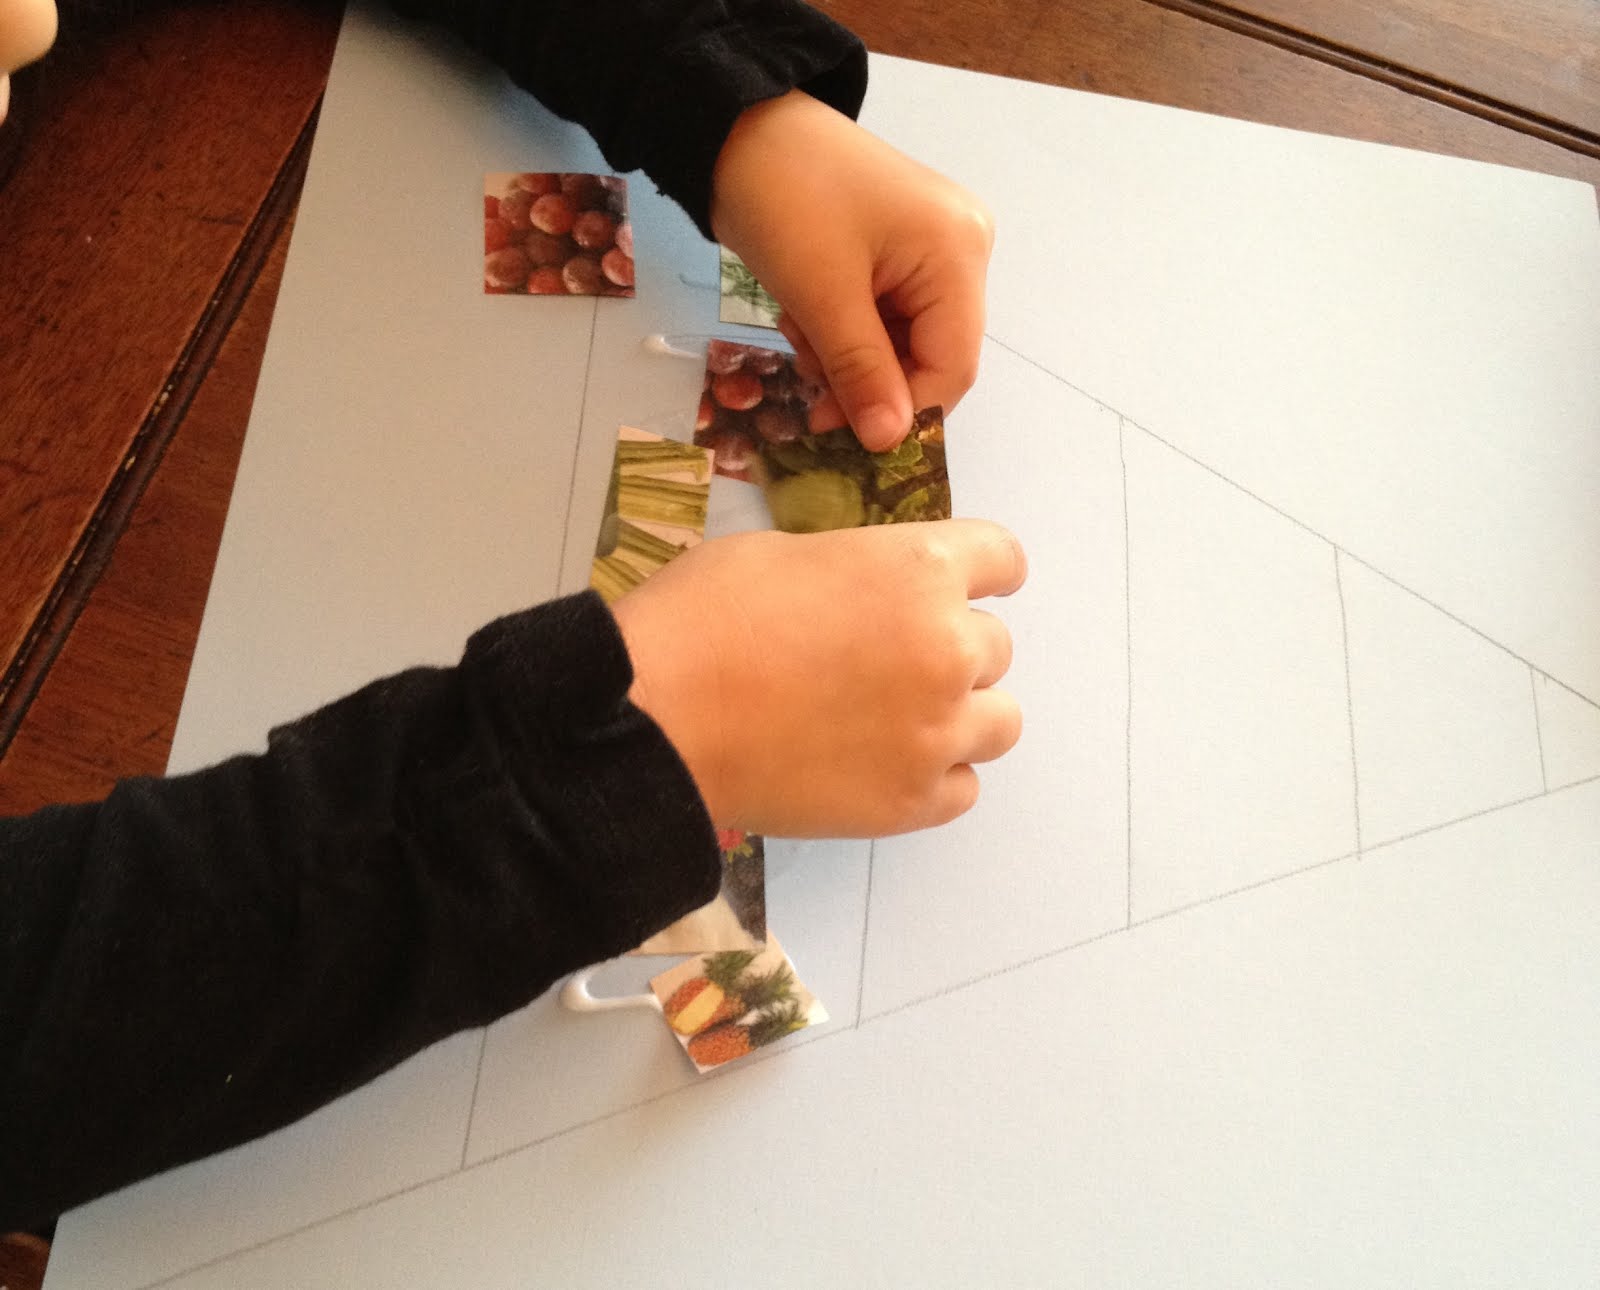
 Our preschooler gets pretty emphatic about her food desires. The hubby and I have been trying to explain the basics of healthy eating for a while, and sometimes it starts to feel like nagging. So, I've been racking my brain for all sorts of ways to make learning about healthy eating more interesting for her. I was inspired by all the food advertisements and circulars that came in the mail (in one day).
 I thought all the food pics would make a great food group collage. We've come a long way since the four basic food groups! I decided on the "new food pyramid format." Though I think a collage would also be fun using the "choose my plate" type of format supported by the USDA. We had a lot of fun making our collage (what little kid doesn't love messing with cutting up mail and using glue?!). And of course we had a great talk about food, nutrition, health, and the concept of moderation.
What you'll need:-Circulars for grocery stores, Large piece of paper, Pen, Glue
*Optional - Items to add for yourself, such as beans, rice, dried herbs, etc.
Instructions:
1) Child, parent or both, cut out pictures of food
2) Categorize them into groups. While categorizing you can discuss what the categories are and why certain items may not go where it seems. For example, why would a chocolate ice cream bar be a treat and not dairy? Why does fatty red meat get separated from lean meat? Why is white bread separated from whole grains?
Category Examples: Red meat, fatty foods, sweets; White breads/pasta, potatoes; Dairy Products; Eggs, seafood, lean protein; Nuts & Legumes; Whole grains; Healthy Oils
*Check out the plate and pyramid examples from Harvard's School of Public Health: http://www.hsph.harvard.edu/nutritionsource/what-should-you-eat/pyramid/
3) Draw a pyramid on the paper with 6 sections for each food category
4) Paste items in each category. Discuss why you would eat more of certain types of foods and less of others.
5) Label the categories with daily servings of each.


Monday, March 26, 2012
Romanesco broccoli

You can have your fractals and eat them too...
At first glance, romanesco broccoli looks like it comes from a different planet. If you want to serve something visually stunning, you can't get much better than romanesco broccoli. It looks like a new age hybrid of broccoli and cauliflower. But, the truth is that this is a species unto itself, and has a long culinary history in Italy. A lovely example of fractal forms occuring in nature. The flavor of romanesco broccoli is milder than a cauliflower, with a lovely chartreuse color.
How did we eat 'em? I imagine the possibilities are endless, think of what you may do with broccoli or cauliflower. But, I was in a pinch to make dinner, so steamed the florets in the microwave for 4 minutes, spritzed with lemon and a little salt and pepper. This paired wonderfully with chicken breast and brown basmati rice. I added some creamy lemon/dill sauce (think hollandaise with dill). It reminded me of an updated version of my mom's broccoli divan. Comfort food with a kick!
Wednesday, March 21, 2012
Apples, and carrots, and cabbage, oh my! (Baby Food)

Ingredients:
- 2 apples
- 1 carrot
- 1/4 head small cabbage (our whole cabbage was about softball sized)
Yields: About 10 oz
1) Wash/clean, peel, and chop ingredients
2) Put about 1/2c water (or enough to cover about the bottom of the pan by about 1/2 an inch) in a medium sauce pan, place steamer basket in pan
3) Put chopped carrot in pan, cover, steam for 10 mins
4) Add chopped apples to pan, cover, steam additional 10 mins
5) Add chopped cabbage (or greens) in pan, cover, steam additional 10 mins
6) Check veggies, carrots and apples should easily pierce with fork. Cabbage leaves should be semi-transluscent
7) Remove from heat and remove lid from pan
8) Puree cooled veggies using hand blender or food processor
Another option, is to steam and puree these foods separately and experiment with ratios, this may be especially helpful if you have a picky eater that may be sensitive to new flavors. Also, if you have a little one prone to a lot of gassiness you may want to try lesser amounts of cabbage or subsitituting a different leafy green.

Carrots as a first finger food

Our 10 month old wants to be a big boy and eat on his own! So, just when I've got my baby food making down, now it's time to experiment with finger foods and new textures. See guidelines for finger foods here: http://kellymom.com/nutrition/starting-solids/finger-foods/.
I've started with carrots from our produce box and our little guy loves them. He is very excited to feed himself!

Finger food carrots for older infant
Ingredients:
-2 carrots
Directions:
1) Wash, peel, carrot
2) Slice into approximately 1/4 inch slices
3) Cut each slice into quarters or sixths (small chunks pea-sized or smaller)
4) Steam in steamer basket until easily pierced with a fork (approximately 15 mins) I steam on med-low heat, in a medium-sized pot with approximately 1/3-1/2 cup water, with pot covered.5) Test mushiness but taking out a few chunks and mashing them with a fork. The chunks should mash with little effort. This is important, you want your baby to be able to easily mash the carrots with their gums, otherwise, there is a choking risk.
6) Cool and serve (or store)

Tuesday, March 20, 2012
White Sapote & Peanut Butter Sandwich

White sapotes are gem I'd never even heard of, but was thankfully introduced to them by Squeeze Play Organics. The variety we enjoy are deliciously ripe and sweet when they slightly give to pressure. Skin more yellowish vs green is also an indicator of ripeness. The flesh is creamy with almost a avocado-like texture, but the taste is quite different. Almost like a mild, creamy peach, in my opinion. Look out for medium sized and larger white seeds, don't eat 'em! Also, we don't eat the skin either.
Our now 10 month old loves just eating the flesh plain. I scoop it out with a baby spoon. White sapotes make a very easy and portable baby food, he loves it. My three year-old is much more skeptical of new things. She did try eating just the fruit, but that was a no-go. What worked instead was a white sapote & peanut butter sandwich. Wow was it delicious!
Ingredients:
-Bread
-One White Sapote
-Peanut or Almond butter
Directions:
1) Rinse of skin of white sapote
2) Scoop out flesh into a small bowl
3) Mash with a fork
4) Spread white sapote on one side of bread, and nut butter on the other
Pea Tendrils

What on earth to do with pea tendrils in your CSA box or pea shoots in your home garden for that matter? Who knew these little shoots were packed with nutrients and delicious?! I didn't even know they were edible!
So what can you expect from pea tendrils and this recipe?
A refreshing and savory taste of early spring. Pea tendrils are the tender shoots of young pea plants and are edible. They have a delicate almost spinachy flavor. This is a delicious way to harvest these young plants and make a beautiful side dish.
Ingredients:
1 bunch pea tendrils (when bunched together I the stalks make about a half dollar size)
2 teaspoons garlic greens or 3 minced garlic cloves
1 tablespoon olive oil
½ lemon, juice of
salt
Directions:
1) Gently clean pea tendrils by wiping them with a slightly damp paper towel.
2) Cut off the woody end of the pea tendrils, about one inch of the thick end.
3) Heat oil in frying pan over medium high heat.
4) Add pea tendrils, garlic, lemon juice, and salt
5) Cook approximately 4 minutes, until pea tendrils are just wilted and still vibrantly green.6Remove from pan immediately to avoid overcooking.
Monday, March 19, 2012
Box o' Fun

I have become a big fan of ordering online. What I don't love is all the junk that comes along with those orders. But it really is true that kids are entertained by the simplest things. So please do recycle those boxes, but think like a kid... how can you get a little more bang for your box before they're chucked in the blue bin? Use them as giant building blocks for making towers and forts, big boxes can make a fun playhouse or puppet theater, and who can deny that kids seem to find just sitting in them irresistible. Cardboard can also be repurposed to make stencils or patterns for your kiddos learning to write.
Sunday, March 18, 2012
"Really Ugly Apples" = Really Tasty Applesauce

I love when Squeeze Play and Abundant Harvest Organics have deals on "ugly" and "really ugly" apples. These are apples that are cosmetically, not so cute. But in their imperfection are just as tasty as the so-called pretty apples. Last week I got an amazing deal on a 10 lbs bag of "really ugly" apples, so it's apple sauce time!
For a large batch, first I wash, peel, and chop the apples. I'll steam apples in a pot with a silicone steamer basket and shallow water. I put about 1/2 of an inch of water in the bottom a pan. I put chopped apples in the steamer basket, and steam on the stove top for about 10 mins. After that, I let the apples cool. I then put the apples in a large mixing bowl and mash them using my trusty hand blender. My variety is the Juiceman hand blender. It's got plenty of power and mushes things up pretty well.
For smaller batches, I use my trusty Baby Brezza. Again, wash, peel, and chop into bite size pieces. I set the the machine to steam/blend for 20 mins.
I don't season my apple sauce because I think it's delicious as-is, but these would be yummy with a bit of cinnamon too!
After that, I fill up ice cube trays with the apple sauce. Once frozen I pop out the cubes into freezer bags to be used as needed.
Here's a picture of my Baby Brezza in actioun making apple sauce for me.
Saturday, March 17, 2012
The produce holy trinity - getting started with baby food

What I call the baby food "holy trinity" is basically my produce must-haves for baby food and really it's pretty simple...
*Something orange
*Something green
*Something sweet
I always have something from each of these categories on hand or in the freezer.
Here are my examples from each category.
*Orange*
Sweet potato, butternut squash, carrots, pumpkin, persimmon
*Green*
Spinach, kale, chard, collard greens
*Sweet*
Apples, bananas, pears
For small infants, it's often recommended to start slow and with single food items at a time. There are many guides available online as to how/when to introduce single food items. One thing that is good to note, with my daughter I started with rice cereal instead of veggies. I'd heard and even read that starting off with a mild grain cereal was best. But in a few short years, thoughts about that seem to be changing. Before introducing solids (at age 6 months) to my son, I did some research again. This time around I found more articles suggesting that there's no benefit to inroducing a cereal instead of fruits/veggies. This time around, I primarily started off with fruits/veggies and have a fantastic eater who loves his fresh purees. Could be coincidence, but I'm glad I didn't only offer cereals early on.
Now my little guy is older and can eat a more varied diet. Having one thing readily available form each of my "holy trinity" categories provides me with a nice variety to keep my little guy fed nutritiously.
Friday, March 16, 2012
Baby poo woes

So, most babies have problems with poo at one time or another. For our little man (9 months old) hard stools and slight constipation is sometimes a problem. What I've found keeps our little guy going like a champ is to have a good whole grain and a good leafy green. My favorites are bulgar and spinach. Bulgar is a whole grain, and high in fiber. Spinach is known to be very nutrient-rich, and a good colon-cleansing aid. I like to keep these on hand and little man gets at least one of these daily.
Bulgar-For bulgar I cook/boil it ahead of time, and freeze in an ice cube tray, this gives me ready-made 1 oz servings.
Spinach (or other leafy greens)-I usually get some type of dark leafy green from my weekly produce box. I like spinach best, but little guy eats it all- spinach, kale, chard, collard greens. For all of these, I remove the stems and large veins. If these are left in they often create little "strings" in the puree, and I won't my greens puree as smooth as possible. After removing the stems/veins, I wash the greens, then place in a silicone steaming basket in a large pot. I add water to the pot (enough to cover the bottom of the pan by about 1/2 an inch) and steam until the greens are tender. Then I puree/blend them using a hand bledner. Then into the ice cube tray & freezer they go.
Thursday, March 15, 2012
Purees - Baby Food & Operation Veggie Sneak Attack

I've been blessed with one fantastic eater in our 10 month old son, and one okay eater in our 3 1/2 year old daugther. With our son, I'm able to feed him straight up fruit and veggie purees. With our daughter, we usually offer her fruits and veggies in their most purest form. These offerings are usually met with her barely touching her tongue to the fruit/veggie and quick "no thanks, momma." So, we have to be a bit more creative with her.
Ready, set, make purees - Steam, Puree, Freeze!
Here's where purees are a life saver and work great for the whole family. I love to steam and puree fruits and veggies and keep them stockpiled. If making small to medium batches I use the Baby Brezza. It is a baby food maker that steams/purees all in one step. I love it! When making large batches of purees, I'll steam on the stove top and either use the Baby Brezza for pureeing or use my hand blender. [If using the stove top method, make sure there's enough water in the pot to steam the veggies, but not so much that your veggies or steamer basket are submergered. Also, retain some or all of the water for pureeing with the fruits/veggies to make a smoother puree.] Now for storage- for me, I find that freezing in ice cube trays make it easy for me to determine portions. Each cube makes 1 ounce of puree. Next, pop the cubes of the trays and store in freezer bags, labeled with the date they were made. A couple important notes, don't store food in the trays too long, over 24 hours or so and they can get freezer burned, move them out of the trays quickly. Also, buy a good freezer bag. Not all storage bags work well as freezer bags. So, buy a thicker bag labeled as "freezer" bags.
For the babe-When we first introduced foods to our baby, it was one fruit/veggie at a time. But now a meal is usually a combo of 3-4 cubes of different fruits/veggies, with possibly a cube of protein and/or whole grain. For example for breakfast he had- 2 cubes apple sauce, 1 cube butternut squash, 1 cube chard, and 1 cube bulgar. Zapped the frozen cubes in the microwave for 75 sec, and tada, breakfast! (So usually he eats 4-5 cubes or ounces of food per meal.)
For the preschooler (and the rest of us)- I have waged a full-on fruit/veggie sneak attack. I put purees in everything- pancakes, grilled cheese sandwiches, mac n' cheese, muffins, and on and on. Really the family pretty much can never tell, but I get the satisfaction of knowing I snuck some good stuff into them :)
Ok, last thing... do NOT get discouraged! Find a way to make a healthy eating plan work for you!
Would it work better to take an afternoon and make big batches all at once to freeze? Or, would you find it easier to make small batches while you're preparing meals on a daily basis?
You don't have a weekly produce delivery? Our produce deliveries work great for us (it's cheaper and easier than going to the store on a weekly basis, bonus that it's fresh, organic, and I know where it comes from... I could go on). But, this isn't an option for everyone. So, get your veggies/fruits elsewhere! Farmer's Market, grocery store, fresh, frozen, or even canned. Anything is better than nothing!
Subscribe to:
Posts (Atom)