Pages

Friday, March 30, 2012

Sweet Potato Chocolate Milk

What kid doesn't love chocolate milk? Sweet potato puree nearly disappears in the sweet treat. Trust me, our little lady is a chocolate milk connoisseur and doesn't detect it whatsoever.

Yields: Approx 7 oz

Ingredients:
6 oz chocolate milk (we like Silk PureAlmond Dark Chocolate Almond Milk, but it's just as good with the dairy version)
1 oz cooked sweet potato puree

Directions:
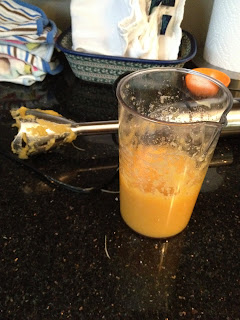
Blend chocolate milk and defrosted sweet potato puree for 30 seconds with a hand blender to fully incorporate the puree with the milk.

Thursday, March 29, 2012

Filling Sweet Potato Bars

 Ok, these are really sweet potato, banana, apple, spinach bars - Don't tell my kids!

These tasty little treats are yummy for all, but I made them especially for our 10 month old. He wants to feed himself, and of course the purees just won't do for that! I went with grated apple because it seems to hold things together a little better. This is a bit denser than a cake. I imagine a cream cheese frosting would be amazing on these. Makes a great "feed yourself" food for the older infant. My picky eater daughter also loves them. 


Ingredients:
1 1/3 cups whole wheat flour
1/2 cup brown sugar
2 teaspoons baking powder
1/2 teaspoon allspice
1/2 teaspoon nutmeg
1/2 teaspoon cinnamon
1/2 teaspoon salt
1 1/2 cups mashed sweet potatoes
1 mashed banana
1 cup grated apple
3 oz pureed spinach (3 oz is approximately 1/3c + 1tbs) (can substitute or kale, or collard greens)
1/4 cup melted butter
2 eggs, lightly beaten

Directions:
1) Preheat oven to 400 degrees
2) Grease pan with butter or cooking spray
3) In a medium bowl, combine flour,sugar,baking powder,allspice,salt.
4) In a large bowl, combine potatoes,melted butter bananas,eggs, blend well.
5) Gently toss grated apples in flour mixture
6) Add to flour mixture to wet ingredients and gently stir
7) Pour into pan. I used a glass 8" square baking dish. Cooking times will vary based on cooking dish!
8) Bake at 400 for 30 mins and test doneness. To test doneness, pierce in middle with fork or knife, it should come out clean. Continue baking until cake appears firm in the middle, is slightly golden on top, and passes the "doneness" test! Cooking times will vary.
* This should be done, but it will set more as it cools. Let cool to room temperature. (I know it smells delicious, but wait for it to rest!) I make small rectangles and store it in the refrigerator. They seem to get even a little denser after settling over night. A great breakfast for younguns.

Tuesday, March 27, 2012

Arts/Crafts - Food Pyramid Collage

Our preschooler gets pretty emphatic about her food desires. The hubby and I have been trying to explain the basics of healthy eating for a while, and sometimes it starts to feel like nagging. So, I've been racking my brain for all sorts of ways to make learning about healthy eating more interesting for her. I was inspired by all the food advertisements and circulars that came in the mail (in one day).

I thought all the food pics would make a great food group collage. We've come a long way since the four basic food groups! I decided on the "new food pyramid format." Though I think a collage would also be fun using the "choose my plate" type of format supported by the USDA. We had a lot of fun making our collage (what little kid doesn't love messing with cutting up mail and using glue?!). And of course we had a great talk about food, nutrition, health, and the concept of moderation.

What you'll need:-Circulars for grocery stores, Large piece of paper, Pen, Glue
*Optional - Items to add for yourself, such as beans, rice, dried herbs, etc.

Instructions:
1) Child, parent or both, cut out pictures of food
2) Categorize them into groups. While categorizing you can discuss what the categories are and why certain items may not go where it seems. For example, why would a chocolate ice cream bar be a treat and not dairy? Why does fatty red meat get separated from lean meat? Why is white bread separated from whole grains?
Category Examples: Red meat, fatty foods, sweets; White breads/pasta, potatoes; Dairy Products; Eggs, seafood, lean protein; Nuts & Legumes; Whole grains; Healthy Oils
*Check out the plate and pyramid examples from Harvard's School of Public Health: http://www.hsph.harvard.edu/nutritionsource/what-should-you-eat/pyramid/
3) Draw a pyramid on the paper with 6 sections for each food category
4) Paste items in each category. Discuss why you would eat more of certain types of foods and less of others.
5) Label the categories with daily servings of each.

Monday, March 26, 2012

Romanesco broccoli


You can have your fractals and eat them too...

At first glance, romanesco broccoli looks like it comes from a different planet. If you want to serve something visually stunning, you can't get much better than romanesco broccoli. It looks like a new age hybrid of broccoli and cauliflower. But, the truth is that this is a species unto itself, and has a long culinary history in Italy. A lovely example of fractal forms occuring in nature. The flavor of romanesco broccoli is milder than a cauliflower, with a lovely chartreuse color.

How did we eat 'em? I imagine the possibilities are endless, think of what you may do with broccoli or cauliflower. But, I was in a pinch to make dinner, so steamed the florets in the microwave for 4 minutes, spritzed with lemon and a little salt and pepper. This paired wonderfully with chicken breast and brown basmati rice. I added some creamy lemon/dill sauce (think hollandaise with dill). It reminded me of an updated version of my mom's broccoli divan. Comfort food with a kick!

Wednesday, March 21, 2012

Apples, and carrots, and cabbage, oh my! (Baby Food)


Ingredients:
- 2 apples
- 1 carrot
- 1/4 head small cabbage (our whole cabbage was about softball sized)

Yields: About 10 oz

1) Wash/clean, peel, and chop ingredients
2) Put about 1/2c water (or enough to cover about the bottom of the pan by about 1/2 an inch) in a medium sauce pan, place steamer basket in pan
3) Put chopped carrot in pan, cover, steam for 10 mins
4) Add chopped apples to pan, cover, steam additional 10 mins
5) Add chopped cabbage (or greens) in pan, cover, steam additional 10 mins
6) Check veggies, carrots and apples should easily pierce with fork. Cabbage leaves should be semi-transluscent
7) Remove from heat and remove lid from pan
8) Puree cooled veggies using hand blender or food processor

Another option, is to steam and puree these foods separately and experiment with ratios, this may be especially helpful if you have a picky eater that may be sensitive to new flavors. Also, if you have a little one prone to a lot of gassiness you may want to try lesser amounts of cabbage or subsitituting a different leafy green.

Carrots as a first finger food


Our 10 month old wants to be a big boy and eat on his own! So, just when I've got my baby food making down, now it's time to experiment with finger foods and new textures. See guidelines for finger foods here: http://kellymom.com/nutrition/starting-solids/finger-foods/.

I've started with carrots from our produce box and our little guy loves them. He is very excited to feed himself!


Finger food carrots for older infant

Ingredients:
-2 carrots

Directions:
1) Wash, peel, carrot
2) Slice into approximately 1/4 inch slices
3) Cut each slice into quarters or sixths (small chunks pea-sized or smaller)
4) Steam in steamer basket until easily pierced with a fork (approximately 15 mins) I steam on med-low heat, in a medium-sized pot with approximately 1/3-1/2 cup water, with pot covered.5) Test mushiness but taking out a few chunks and mashing them with a fork. The chunks should mash with little effort. This is important, you want your baby to be able to easily mash the carrots with their gums, otherwise, there is a choking risk.
6) Cool and serve (or store)

Tuesday, March 20, 2012

White Sapote & Peanut Butter Sandwich


White sapotes are gem I'd never even heard of, but was thankfully introduced to them by Squeeze Play Organics. The variety we enjoy are deliciously ripe and sweet when they slightly give to pressure. Skin more yellowish vs green is also an indicator of ripeness. The flesh is creamy with almost a avocado-like texture, but the taste is quite different. Almost like a mild, creamy peach, in my opinion. Look out for medium sized and larger white seeds, don't eat 'em! Also, we don't eat the skin either.

Our now 10 month old loves just eating the flesh plain. I scoop it out with a baby spoon. White sapotes make a very easy and portable baby food, he loves it. My three year-old is much more skeptical of new things. She did try eating just the fruit, but that was a no-go. What worked instead was a white sapote & peanut butter sandwich. Wow was it delicious!

Ingredients:
-Bread
-One White Sapote
-Peanut or Almond butter

Directions:
1) Rinse of skin of white sapote
2) Scoop out flesh into a small bowl
3) Mash with a fork
4) Spread white sapote on one side of bread, and nut butter on the other

Pea Tendrils


What on earth to do with pea tendrils in your CSA box or pea shoots in your home garden for that matter? Who knew these little shoots were packed with nutrients and delicious?! I didn't even know they were edible!

So what can you expect from pea tendrils and this recipe?
A refreshing and savory taste of early spring. Pea tendrils are the tender shoots of young pea plants and are edible. They have a delicate almost spinachy flavor. This is a delicious way to harvest these young plants and make a beautiful side dish.

Ingredients:
1 bunch pea tendrils (when bunched together I the stalks make about a half dollar size)
2 teaspoons garlic greens or 3 minced garlic cloves
1 tablespoon olive oil
½ lemon, juice of
salt

Directions:
1) Gently clean pea tendrils by wiping them with a slightly damp paper towel.
2) Cut off the woody end of the pea tendrils, about one inch of the thick end.
3) Heat oil in frying pan over medium high heat.
4) Add pea tendrils, garlic, lemon juice, and salt
5) Cook approximately 4 minutes, until pea tendrils are just wilted and still vibrantly green.6Remove from pan immediately to avoid overcooking.

Monday, March 19, 2012

Box o' Fun


I have become a big fan of ordering online. What I don't love is all the junk that comes along with those orders. But it really is true that kids are entertained by the simplest things. So please do recycle those boxes, but think like a kid... how can you get a little more bang for your box before they're chucked in the blue bin? Use them as giant building blocks for making towers and forts, big boxes can make a fun playhouse or puppet theater, and who can deny that kids seem to find just sitting in them irresistible. Cardboard can also be repurposed to make stencils or patterns for your kiddos learning to write.

Sunday, March 18, 2012

"Really Ugly Apples" = Really Tasty Applesauce


I love when Squeeze Play and Abundant Harvest Organics have deals on "ugly" and "really ugly" apples. These are apples that are cosmetically, not so cute. But in their imperfection are just as tasty as the so-called pretty apples. Last week I got an amazing deal on a 10 lbs bag of "really ugly" apples, so it's apple sauce time!

For a large batch, first I wash, peel, and chop the apples. I'll steam apples in a pot with a silicone steamer basket and shallow water. I put about 1/2 of an inch of water in the bottom a pan. I put chopped apples in the steamer basket, and steam on the stove top for about 10 mins. After that, I let the apples cool. I then put the apples in a large mixing bowl and mash them using my trusty hand blender. My variety is the Juiceman hand blender. It's got plenty of power and mushes things up pretty well.

For smaller batches, I use my trusty Baby Brezza. Again, wash, peel, and chop into bite size pieces. I set the the machine to steam/blend for 20 mins.

I don't season my apple sauce because I think it's delicious as-is, but these would be yummy with a bit of cinnamon too!

After that, I fill up ice cube trays with the apple sauce. Once frozen I pop out the cubes into freezer bags to be used as needed.

Here's a picture of my Baby Brezza in actioun making apple sauce for me.

Saturday, March 17, 2012

The produce holy trinity - getting started with baby food


What I call the baby food "holy trinity" is basically my produce must-haves for baby food and really it's pretty simple...

*Something orange
*Something green
*Something sweet

I always have something from each of these categories on hand or in the freezer.

Here are my examples from each category.

*Orange*
Sweet potato, butternut squash, carrots, pumpkin, persimmon

*Green*
Spinach, kale, chard, collard greens

*Sweet*
Apples, bananas, pears

For small infants, it's often recommended to start slow and with single food items at a time. There are many guides available online as to how/when to introduce single food items. One thing that is good to note, with my daughter I started with rice cereal instead of veggies. I'd heard and even read that starting off with a mild grain cereal was best. But in a few short years, thoughts about that seem to be changing. Before introducing solids (at age 6 months) to my son, I did some research again. This time around I found more articles suggesting that there's no benefit to inroducing a cereal instead of fruits/veggies. This time around, I primarily started off with fruits/veggies and have a fantastic eater who loves his fresh purees. Could be coincidence, but I'm glad I didn't only offer cereals early on.

Now my little guy is older and can eat a more varied diet. Having one thing readily available form each of my "holy trinity" categories provides me with a nice variety to keep my little guy fed nutritiously.

Friday, March 16, 2012

Baby poo woes


So, most babies have problems with poo at one time or another. For our little man (9 months old) hard stools and slight constipation is sometimes a problem. What I've found keeps our little guy going like a champ is to have a good whole grain and a good leafy green. My favorites are bulgar and spinach. Bulgar is a whole grain, and high in fiber. Spinach is known to be very nutrient-rich, and a good colon-cleansing aid. I like to keep these on hand and little man gets at least one of these daily.


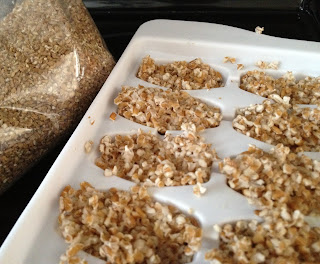
Bulgar-For bulgar I cook/boil it ahead of time, and freeze in an ice cube tray, this gives me ready-made 1 oz servings.

Spinach (or other leafy greens)-I usually get some type of dark leafy green from my weekly produce box. I like spinach best, but little guy eats it all- spinach, kale, chard, collard greens. For all of these, I remove the stems and large veins. If these are left in they often create little "strings" in the puree, and I won't my greens puree as smooth as possible. After removing the stems/veins, I wash the greens, then place in a silicone steaming basket in a large pot. I add water to the pot (enough to cover the bottom of the pan by about 1/2 an inch) and steam until the greens are tender. Then I puree/blend them using a hand bledner. Then into the ice cube tray & freezer they go.

Thursday, March 15, 2012

Purees - Baby Food & Operation Veggie Sneak Attack


I've been blessed with one fantastic eater in our 10 month old son, and one okay eater in our 3 1/2 year old daugther. With our son, I'm able to feed him straight up fruit and veggie purees. With our daughter, we usually offer her fruits and veggies in their most purest form. These offerings are usually met with her barely touching her tongue to the fruit/veggie and quick "no thanks, momma." So, we have to be a bit more creative with her.

Ready, set, make purees - Steam, Puree, Freeze!
Here's where purees are a life saver and work great for the whole family. I love to steam and puree fruits and veggies and keep them stockpiled. If making small to medium batches I use the Baby Brezza. It is a baby food maker that steams/purees all in one step. I love it! When making large batches of purees, I'll steam on the stove top and either use the Baby Brezza for pureeing or use my hand blender. [If using the stove top method, make sure there's enough water in the pot to steam the veggies, but not so much that your veggies or steamer basket are submergered. Also, retain some or all of the water for pureeing with the fruits/veggies to make a smoother puree.] Now for storage- for me, I find that freezing in ice cube trays make it easy for me to determine portions. Each cube makes 1 ounce of puree. Next, pop the cubes of the trays and store in freezer bags, labeled with the date they were made. A couple important notes, don't store food in the trays too long, over 24 hours or so and they can get freezer burned, move them out of the trays quickly. Also, buy a good freezer bag. Not all storage bags work well as freezer bags. So, buy a thicker bag labeled as "freezer" bags.

For the babe-When we first introduced foods to our baby, it was one fruit/veggie at a time. But now a meal is usually a combo of 3-4 cubes of different fruits/veggies, with possibly a cube of protein and/or whole grain. For example for breakfast he had- 2 cubes apple sauce, 1 cube butternut squash, 1 cube chard, and 1 cube bulgar. Zapped the frozen cubes in the microwave for 75 sec, and tada, breakfast! (So usually he eats 4-5 cubes or ounces of food per meal.)

For the preschooler (and the rest of us)- I have waged a full-on fruit/veggie sneak attack. I put purees in everything- pancakes, grilled cheese sandwiches, mac n' cheese, muffins, and on and on. Really the family pretty much can never tell, but I get the satisfaction of knowing I snuck some good stuff into them :)

Ok, last thing... do NOT get discouraged! Find a way to make a healthy eating plan work for you!

Would it work better to take an afternoon and make big batches all at once to freeze? Or, would you find it easier to make small batches while you're preparing meals on a daily basis?

You don't have a weekly produce delivery? Our produce deliveries work great for us (it's cheaper and easier than going to the store on a weekly basis, bonus that it's fresh, organic, and I know where it comes from... I could go on). But, this isn't an option for everyone. So, get your veggies/fruits elsewhere! Farmer's Market, grocery store, fresh, frozen, or even canned. Anything is better than nothing!

Friday, March 9, 2012

Home grown


I love plants, I love the greenery, sense of nature, smell, and overall beauty that go along with them. The problem is that plants just don't love me. I have a brown, wilty thumb. But, that hasn't stopped my hubby and I from trying to integrate fruit-bearing plants into our landscaping (or lack thereof). For some reason it just seemed to make sense that if we were going to invest in a plant, that is buy it, water it, and otherwise take care of it, we wanted to get as much out of it as possible.

Some of our plants have been miserable failures, but others have done great. Here in our SoCal environment, weather is on our sides. We've had the most luck with oranges, lemons, and peaches. I have done ok with growing basil, cilantro, and lettuce too.

Here are some of our late winter/early spring home grown foods- delicious oranges and little baby peaches (should be ready in May).

Thursday, March 8, 2012

The big switch (to Organic Produce)

We started getting organic produce delivered to us back in the fall. I love, love, love our service. It also helps that around that time our baby boy started eating solids, and man can the kid eat! Most of the items in our weekly delivery are predetermined by what's in season and available from the contributing farmers. I have been introduced to many produce items I'd rarely had and several I've never even heard of. I want to share what we do with some of these novel items.

But, let me start of by saying that there are several factors that made this switch to organic produce work for us. Boils down to it being affordable and convenient. It's delivered to our doorstep for a $5 delivery charge. Trust me, the gas to go to the store is more than that! I would say the next factor is a dedication to making the produce edible to my family.

So, coming soon are some of the ways I season, cook, sneak, and otherwise somehow get my family to eat their veggies! Even if you don't do organic produce, I hope the ideas will help!

Welcome to me!

There are so many things I think about- so many reflections on how my life has changed over the past few years. So, here goes my attempt to document those reflections. I went from working over full-time, to being a stay-at-home mom. I still work very part-time, 8 hours/week, but do most of that work from home. Quite a life change, and to be honest, some days I'm still reeling from it! I'm sure I'll throw in some ideas about how I try to keep things fun, interesting and stimulating for my kiddos. Some thoughts about how I keep us fed- I LOVE food. And of course my reflections on being a wife, mother, and myself. And of course, I'll throw in some of my sanity savers, those simple daily moments when something happens that makes me smile deep down from my toes.

Oh yeah, and I'm a completely novice blogger, learning as I go. Feel free to shoot me ideas about my blogs!